Friday, 19 December 2014

Christmas Makeup Favourites

Hello,
 
As part of my #countdowntochristmas I have decided to share some of my makeup favourites for Christmas time.


For mascara I have chosen to include a combination of Maybelline's The Colossal Volum' Express mascara and Collection's No Clumps mascara. I love wearing these together, they give me the perfect lashes. I also recommend Maybelline's master precise liquid eyeliner if you are planning to wear eyeliner around Christmas time. It makes applying eyeliner really easy.. well as easy as applying eyeliner can be!!
 
For eye shadows I will be wearing this Bronze shade from No 7 a lot. I got this in a gift box in the Black Friday sale and it is the bottom shade from the Cappuccino trio. This eye shadow is really pigmented and says on for a long time. My other eye shadow suggestions are the Maybelline Colour Tattoos. I have photographed On and On Bronze and Pink-Gold, these are both really shimmery and perfect for Christmas. They are really pigmented and last such a long time. After taking these photos I did actually wear a combination of a Maybelline Colour Tattoo in Permanent Taupe and the No 7 eye shadow, I thought it looked good so I might wear that on Christmas day.
  
 
Onto lips... I have chosen a lip gloss, lip stick and lip butter to share with you. If you are looking for a neutral lip colour I recommend the Revlon Lip Butter in Cotton Candy; it's really moisturising and shimmery, I love it. For Lip Gloss I've chosen a No 7 Lip Gloss in Glaze, this again is I really shimmery neutral colour.
 
If you are a bit more daring I suggest the Sleek Lip Stick in Dare (see what I did there...). I love this colour a lot, it's your perfect A/W matt berry shade.

 
As you will know I love nail polish. I have picked out two nail polishes for Christmas time. On the right it is the Maybelline Colour Show nail polish in Glitter it; it really adds something to a basic nail colour. I used this in my Festive Nail Polish blog post (here). I also have two other nail polish posts related to Christmas and Winter, here and here if you haven't seen them already.
 
My second nail polish choice was No 7's Star Shower nail polish. I'm really impressed with No 7's nail polishes I hadn't tried any since recently and I really recommend them. (Hopefully I will do a review in the New Year after I've finished with all of my Christmas Posts.)
 
 
Thankyou for reading, see you next time. Byee.
 
 
Megan♡


Tuesday, 16 December 2014

Decorated the tree


Hello,

I'm feeling very festive at the moment; I went Christmas present shopping at the weekend and we were watching Miracle on 34th Street in my German lessons - is a great film by the way. We also put our Christmas tree up at the weekend and I took some photos to show you.
 
 
Megan♡


♡ ♡ ♡


Sunday, 14 December 2014

Festive Nail Art #2 - Snowman


Hello,

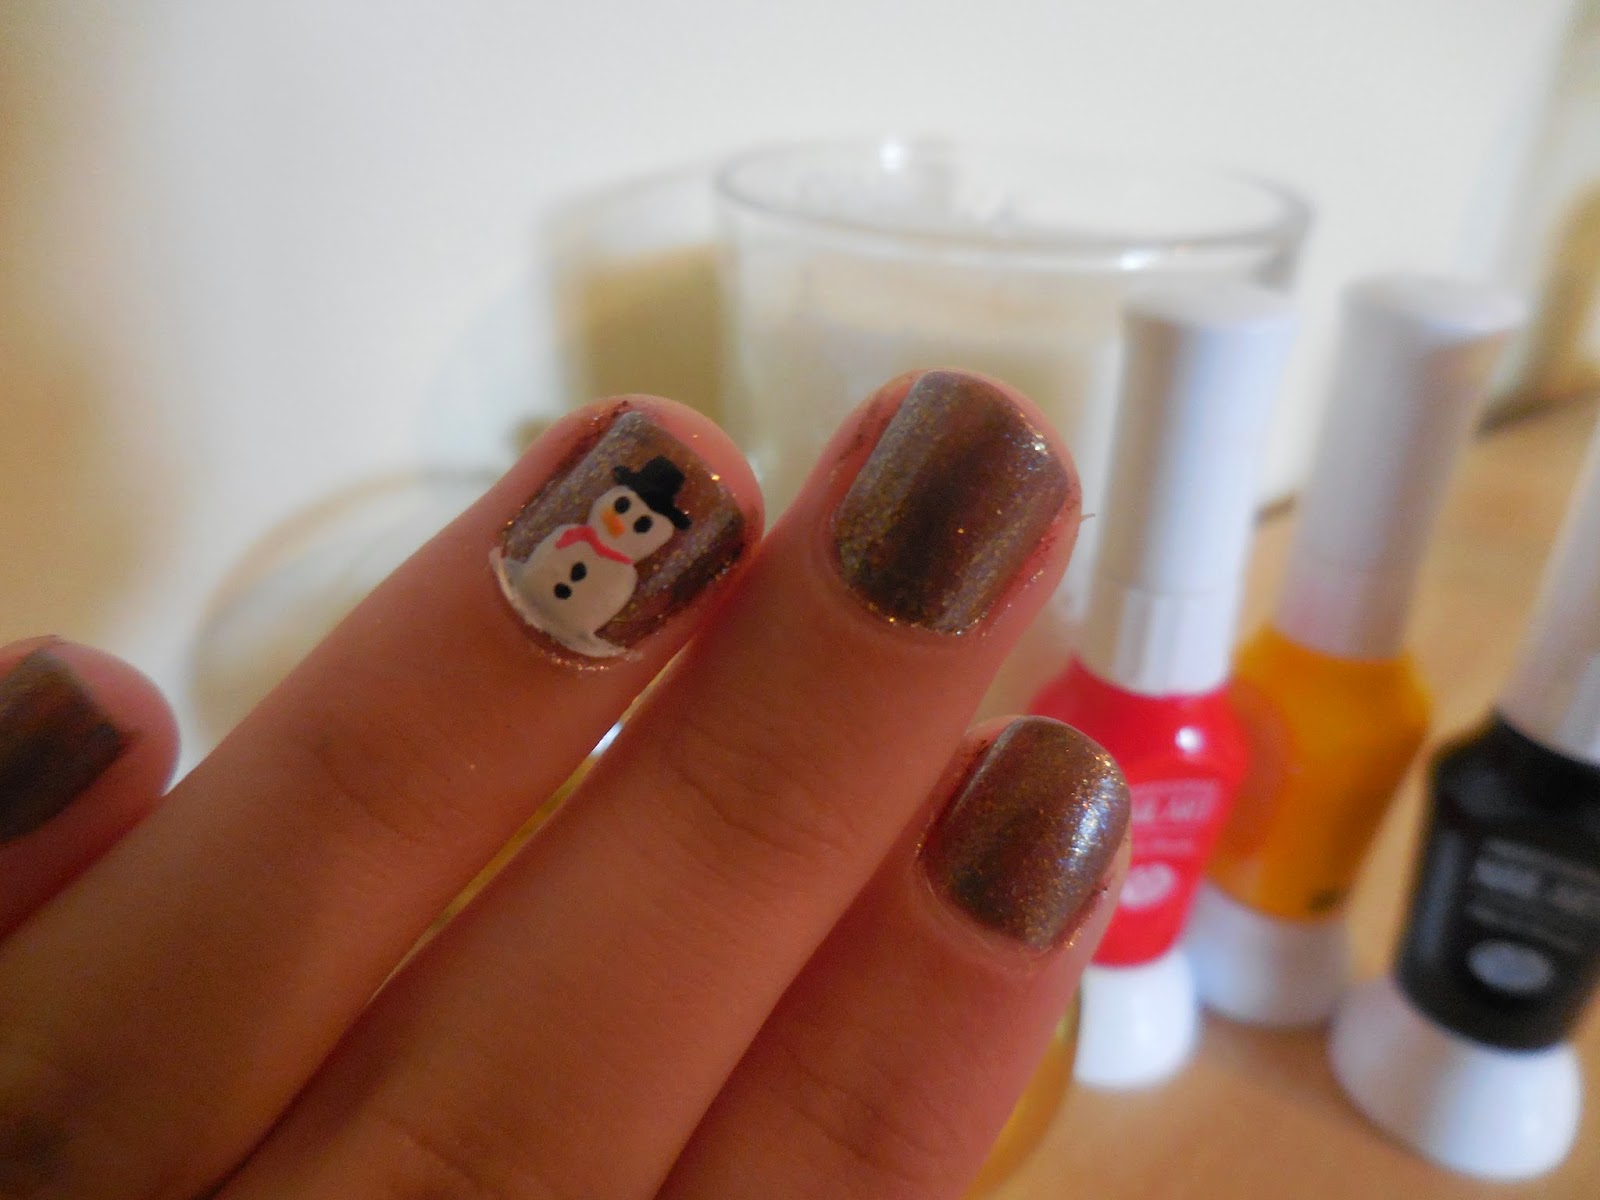
Today I am going to be sharing a snowman nail art tutorial with you. I have posted another festive nail art post (here) already and I will be sharing more festive nail ideas with you very soon. This was the design I did on my nails last year for Christmas.
 

- Rio Professional Nail Art pen & brush (RED, WHITE, BLACK & YELLOW) -
- No 7 Stay Perfect Nail Colour in Star Shower -
- Tanya Burr Nail Polish in Riding Hood -
 
 
Step 1:
 
First you need to paint your nails in your chosen background colour. For this tutorial I have chosen the No 7 nail polish in Star shower. This nail polish is grey with Gold and Blue glitters - the photo does not show off how beautiful this colour really is. It is perfect for the festive season, it just screams Christmas from the name to the colour.
 
Alternatively you could use any other nail colour that white and black will show up well on and as this is a Christmas tutorial possibly a festive colour. I suggest Tanya Burr's Riding Hood nail polish - I have used a red polish in the past and it works really well for this nail look.
 
 
Step 2:
 
When dried you need to apply a white nail polish for the snowman's head, body and the snowy ground. You could do this on every nail or just one like I have. For this you colour use either a nail art pen or apply white nail polish with a cocktail stick, bobby pin/ hair grip or the brush provided (depending on the size). Do bare in mind that a large blob of nail polish will take a long time to dry, so try a use the smallest amount of nail polish as possible.
 
 
Step 3, 4 &5:
 
Now it is time to add the detail. It is very important that the nail polish is completely dry to avoid the colours running.
 
First I used a black nail polish/ nail art pen to create eyes, buttons and a hat on the snowman, try and keep the dots the same size. When creating the buttons leave room for a scarf. To make the hat I drew a small line slightly longer than the head and added a square on top.
 
To make the scarf I drew a line between the head and body and another small line coming off of that. I chose to do this is red but this is up to you, maybe chose a colour that wont clash with the background colour.
 
And last but not least we need to add a carrot nose on our snowman. You could use a Orange nail polish. However I don't have an orange colour so I mixed a small amount of red and yellow nail polish on to a piece of paper and applied that to the nail. This works best if you use a thin brush, bobby pin/ hair grip or cocktail stick.
 
 
And there we have it, a festive snowman nail design... Thankyou for reading, I hope you are enjoying my Christmas blog posts. Stay tuned for more #countdownforchristmas blog posts. I'm still looking for more Christmas/Winter Q&A questions so please feel free to leave them below or on my Instagram. Goodbye.
 
 
Megan♡